
In this blog, you will learn how to build a simple UI-based OData V2 service using the RAP model in SAP.
We’ll create a custom table for billing document header data and expose it as a managed RAP business object. This example demonstrates how to create a List Report and Object Page with full CRUD operations.
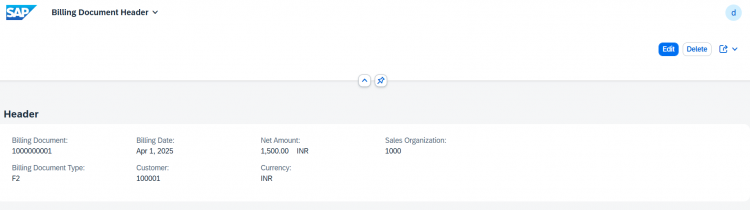
At the end of the exercise, we will have a list report page and an object page as below.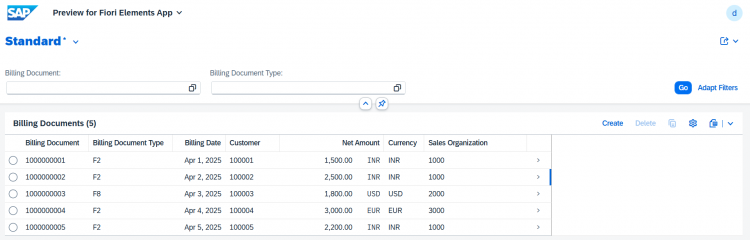
Step 1: Create the Database Table
We’ll begin by creating a custom table that will serve as the root entity for our RAP app.
Steps to Create the Table:
-
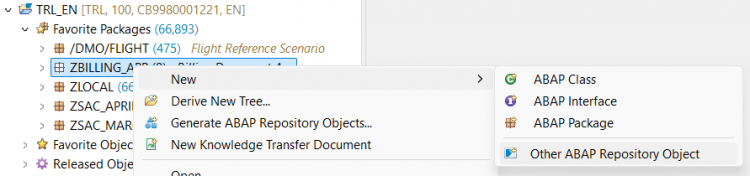
Right-click on your package and choose New > Other ABAP Repository Object
-
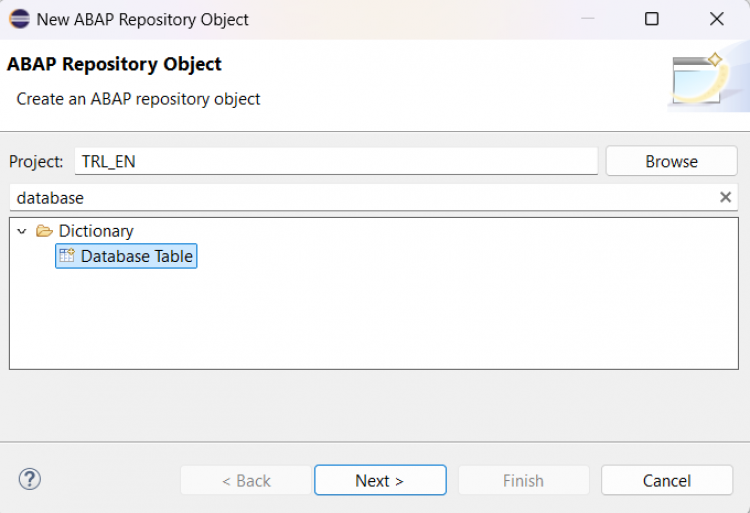
Select Database Table and click Next
-
Enter the object name (e.g.
ZSAC_BILL_HEADER) and description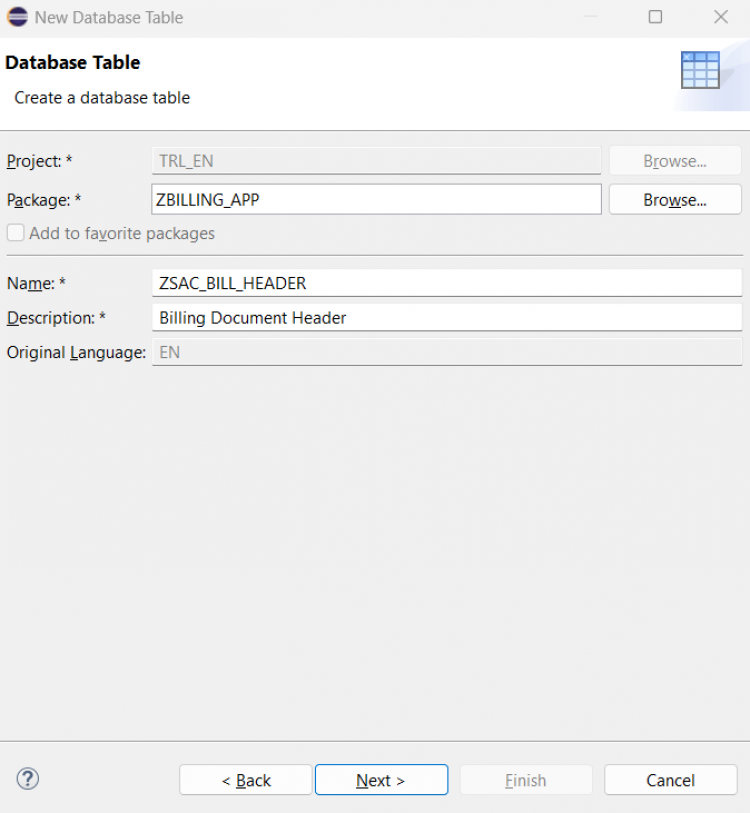
-
Choose a transport request and click Finish
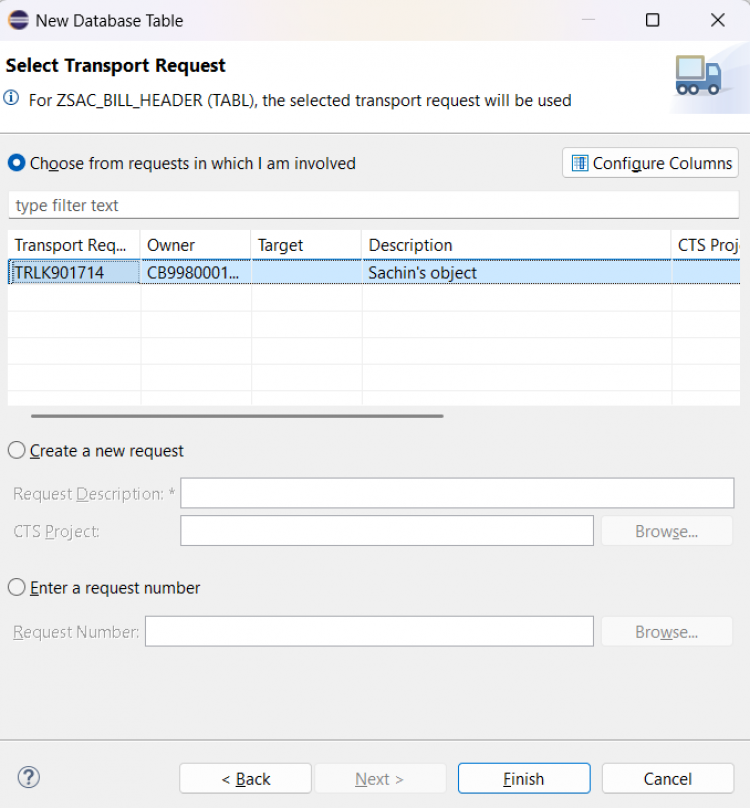
-
Define your table fields after the
clientfield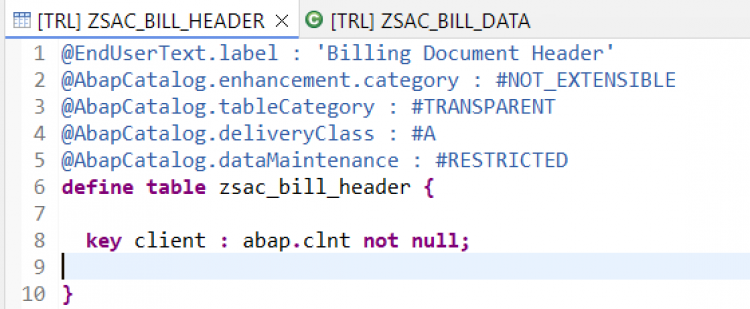
You can copy the field structure from the code snippet below:
@EndUserText.label : 'Billing Document Header'
@AbapCatalog.enhancement.category : #NOT_EXTENSIBLE
@AbapCatalog.tableCategory : #TRANSPARENT
@AbapCatalog.deliveryClass : #A
@AbapCatalog.dataMaintenance : #RESTRICTED
define table zsac_bill_header {

  key client         : abap.clnt not null;
  key bill_id        : abap.numc(10) not null;
  bill_type          : abap.char(4);
  bill_date          : abap.dats;
  customer_id        : kunnr;
  @Semantics.amount.currencyCode : 'zsac_bill_header.currency'
  net_amount         : abap.curr(15,2);
  currency           : waers;
  sales_org          : vkorg;
  createdby          : syuname;
  createdat          : timestamp;
  lastchangedby      : syuname;
  lastchangedat      : timestamp;
  locallastchangedat : timestamp;

}
Once the fields are added, activate the table.
Step 2: Insert Sample Data into the Table
Since the table is empty, let’s insert a few entries using a helper class that implements the IF_OO_ADT_CLASSRUN interface.
Steps to Create the Data Load Class:
-
Right-click your package and select New > ABAP Class
-
Provide a class name (e.g.
ZSAC_CL_LOAD_BILLDATA) and a description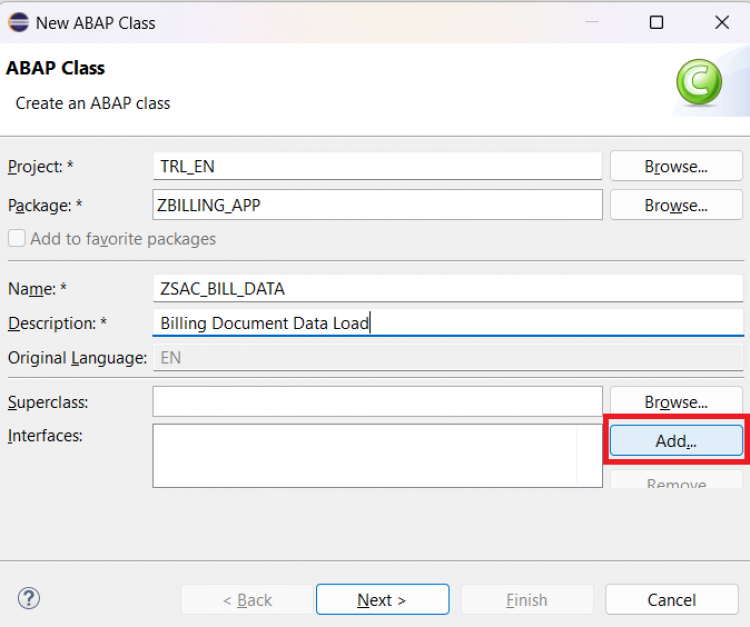
-
In the interface input field, enter
IF_OO_ADT_CLASSRUNand select it
-
Click Next,
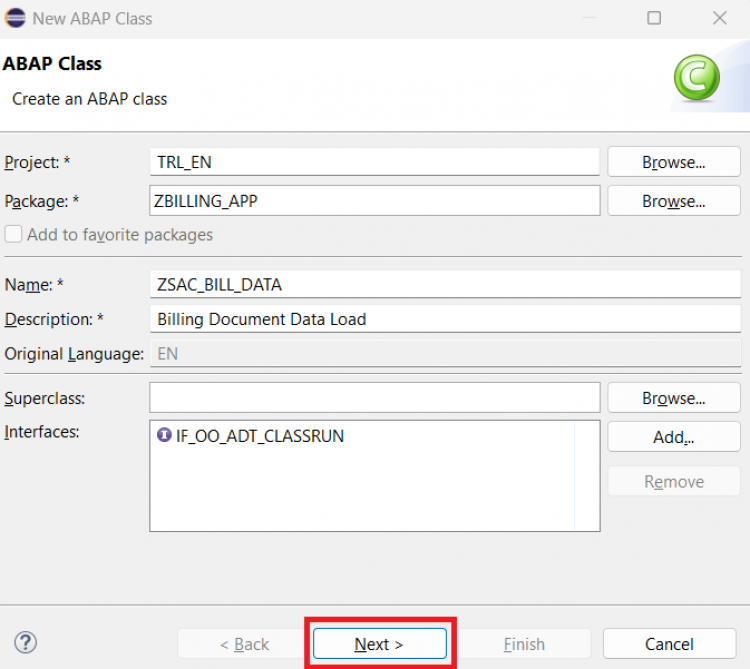
Select a transport request, and click Finish -
Add the below code in the
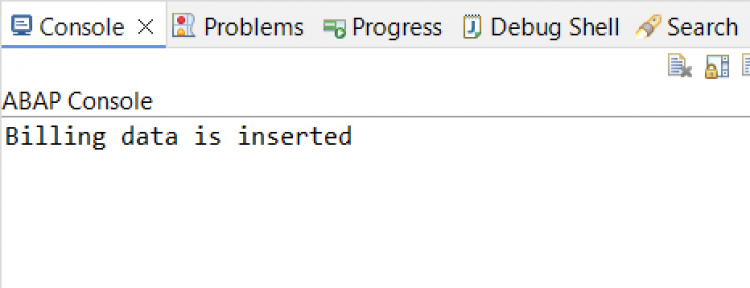
mainmethod to insert sample records:DATA lt_bill_header TYPE STANDARD TABLE OF zsac_bill_header. DELETE FROM zsac_bill_header. lt_bill_header = VALUE #( ( client = sy-mandt bill_id = '1000000001' bill_type = 'F2' bill_date = '20250401' customer_id = '100001' net_amount = '1500.00' currency = 'INR' sales_org = '1000' ) ( client = sy-mandt bill_id = '1000000002' bill_type = 'F2' bill_date = '20250402' customer_id = '100002' net_amount = '2500.00' currency = 'INR' sales_org = '1000' ) ( client = sy-mandt bill_id = '1000000003' bill_type = 'F8' bill_date = '20250403' customer_id = '100003' net_amount = '1800.00' currency = 'USD' sales_org = '2000' ) ( client = sy-mandt bill_id = '1000000004' bill_type = 'F2' bill_date = '20250404' customer_id = '100004' net_amount = '3000.00' currency = 'EUR' sales_org = '3000' ) ( client = sy-mandt bill_id = '1000000005' bill_type = 'F2' bill_date = '20250405' customer_id = '100005' net_amount = '2200.00' currency = 'INR' sales_org = '1000' ) ). INSERT zsac_bill_header FROM TABLE @lt_bill_header. out->write( 'Billing data is inserted' ).Below is the code for whole class for reference -
CLASS zsac_cl_bill_data DEFINITION PUBLIC FINAL CREATE PUBLIC . PUBLIC SECTION. INTERFACES if_oo_adt_classrun . PROTECTED SECTION. PRIVATE SECTION. ENDCLASS. CLASS zsac_cl_bill_data IMPLEMENTATION. METHOD if_oo_adt_classrun~main. DATA lt_bill_header TYPE STANDARD TABLE OF zsac_bill_header. DELETE FROM zsac_bill_header. lt_bill_header = VALUE #( ( client = sy-mandt bill_id = '1000000001' bill_type = 'F2' bill_date = '20250401' customer_id = '100001' net_amount = '1500.00' currency = 'INR' sales_org = '1000' ) ( client = sy-mandt bill_id = '1000000002' bill_type = 'F2' bill_date = '20250402' customer_id = '100002' net_amount = '2500.00' currency = 'INR' sales_org = '1000' ) ( client = sy-mandt bill_id = '1000000003' bill_type = 'F8' bill_date = '20250403' customer_id = '100003' net_amount = '1800.00' currency = 'USD' sales_org = '2000' ) ( client = sy-mandt bill_id = '1000000004' bill_type = 'F2' bill_date = '20250404' customer_id = '100004' net_amount = '3000.00' currency = 'EUR' sales_org = '3000' ) ( client = sy-mandt bill_id = '1000000005' bill_type = 'F2' bill_date = '20250405' customer_id = '100005' net_amount = '2200.00' currency = 'INR' sales_org = '1000' ) ). INSERT zsac_bill_header FROM TABLE @lt_bill_header. out->write( 'Billing data is inserted' ). ENDMETHOD. ENDCLASS. - Run the class using the green "Execute" button.
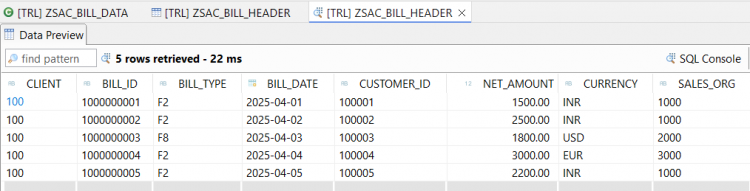
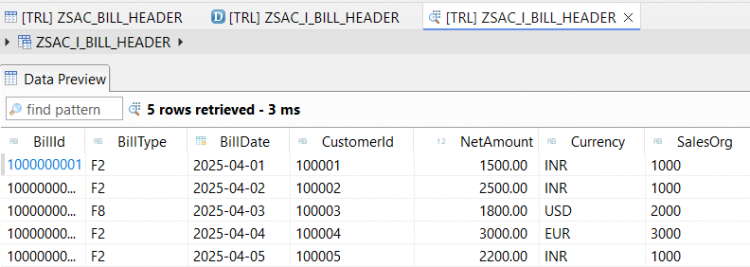
Once complete, your data will be inserted into the custom table. You can now preview the entries using the Data Preview feature.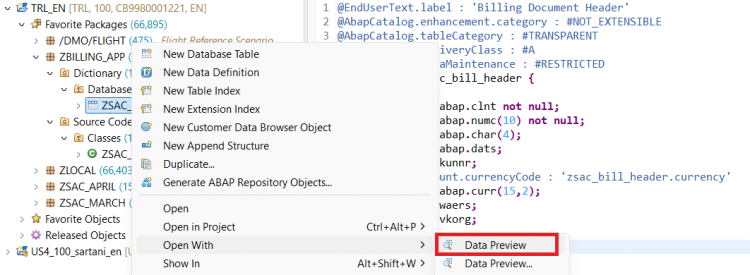
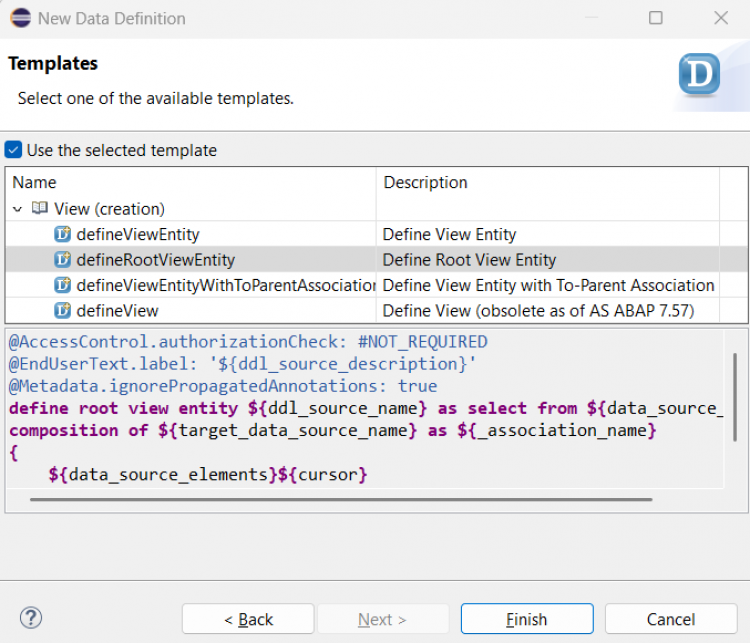
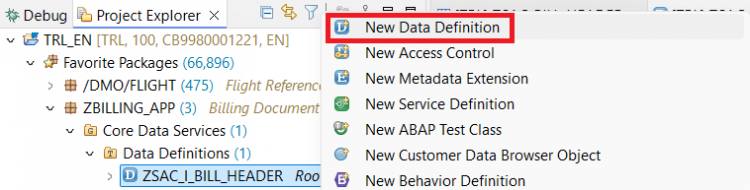
Step 3: Create the Root CDS Entity
Now that we have sample data in the table, the next step is to create a Root CDS Entity which will serve as the foundation for our RAP business object.
-
Right-click on your database table and choose New Data Definition.

-
Provide a name (e.g.
ZSAC_I_Bill_Header) and a meaningful description. Click Next.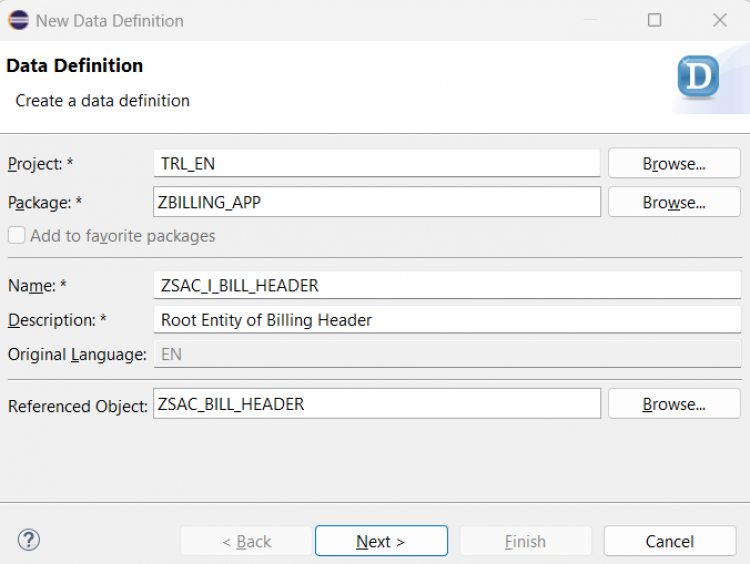
-
Select a transport request and click Next.
-
Choose the template Define Root View Entity and click Finish.
Important:
At this step, you are creating a CDS Entity, not a traditional CDS View. A CDS Entity typically includes features like compositions and associations to related data. However, to keep this example simple, we are not using compositions or associations here.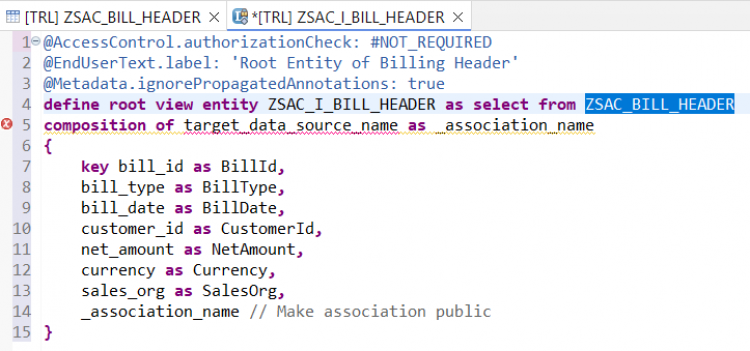
-
Replace the generated code with the following:
@AccessControl.authorizationCheck: #NOT_REQUIRED
@EndUserText.label: 'Root Entity of Billing Header'
define root view entity ZSAC_I_BILL_HEADER
  as select from zsac_bill_header
{
  key bill_id            as BillId,
      bill_type          as BillType,
      bill_date          as BillDate,
      customer_id        as CustomerId,
      @Semantics.amount.currencyCode : 'Currency'
      net_amount         as NetAmount,
      currency           as Currency,
      sales_org          as SalesOrg,
      @Semantics.user.createdBy: true
      CreatedBy          as CreatedBy,
      @Semantics.systemDateTime.createdAt: true
      CreateDat          as CreateDat,
      @Semantics.user.lastChangedBy: true
      LastChangedBy      as LastChangedBy,
      @Semantics.systemDateTime.lastChangedAt: true
      LastChangeDat      as LastChangeDat,
      @Semantics.systemDateTime.localInstanceLastChangedAt: true
      LocalLastChangeDat as LocalLastChangeDat
}
Activate the CDS Entity.
-
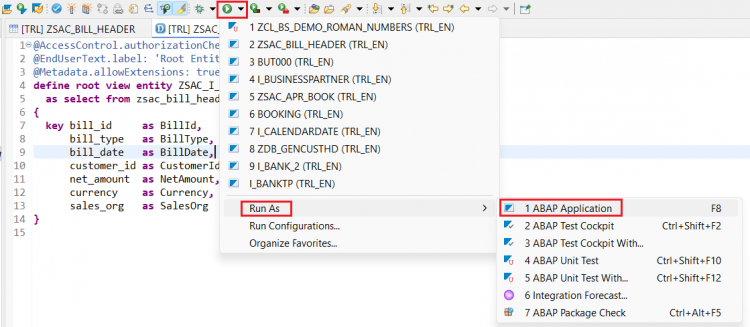
Execute the CDS Entity as an ABAP Application to view the inserted records.
Step 4: Create the Projection Root View
After creating the Root CDS Entity, the next step is to create a Projection View.
This view will expose the fields we want the end user to see in the UI.
-
Right-click on the root view entity and choose New Data Definition.
-
Provide a name (e.g.
ZSAC_C_BillHeader) and a meaningful description. Click Next.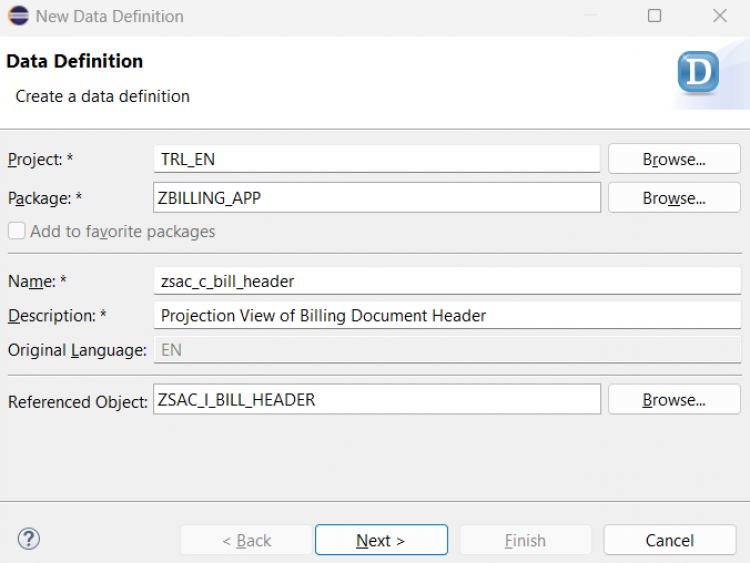
-
Select a transport request and click Next.
-
Choose the template Define Projection View and click Finish.
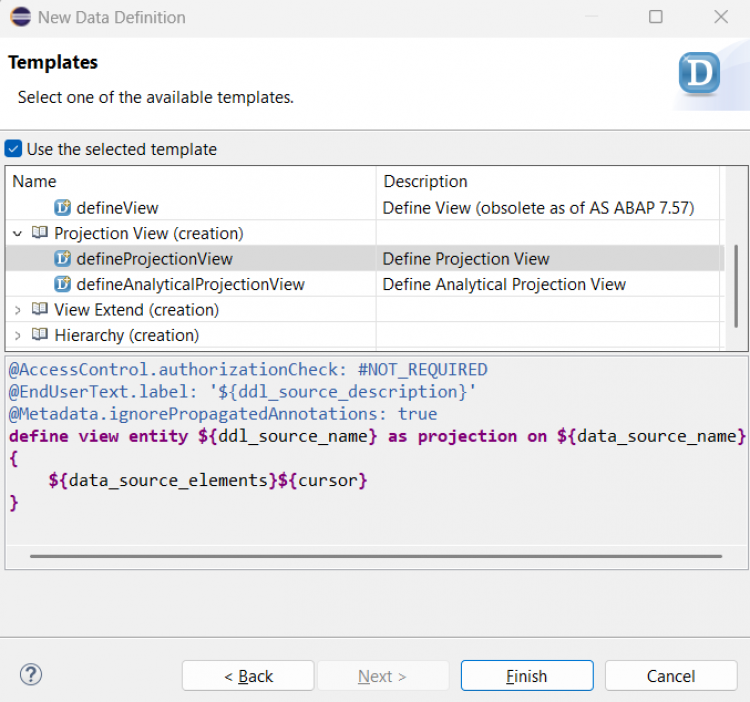
Important:
Since we are creating a projection on top of a Root View Entity, the template does not automatically add therootkeyword. You will encounter some errors initially, but we will fix them in the next step.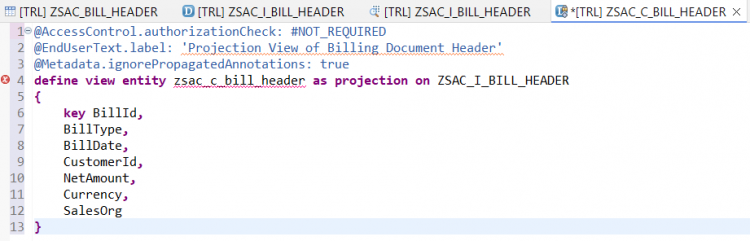
-
Complete the CDS Projection Entity
Replace the generated code with the following:@AccessControl.authorizationCheck: #NOT_REQUIRED @EndUserText.label: 'Projection View of Billing Doc Header' @Metadata.allowExtensions: true define root view entity zsac_c_bill_header provider contract transactional_query as projection on ZSAC_I_BILL_HEADER { key BillId, BillType, BillDate, CustomerId, @Semantics.amount.currencyCode: 'Currency' NetAmount, Currency, SalesOrg, CreatedBy, CreateDat, LastChangedBy, LastChangeDat, LocalLastChangeDat }Activate the projection view.
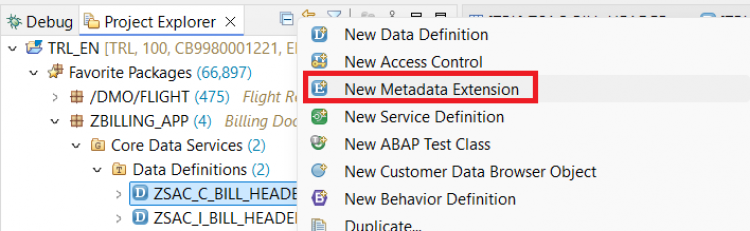
Step 5: Create a Metadata Extension
A Metadata Extension is used to annotate the CDS Entity and its fields.
Using annotations, you can define labels, field positions on the UI, and various other properties to control the look and behavior of your application.
-
Right-click on the Projection View Entity and choose New Metadata Extension.
-
Provide a name (e.g.
ZSAC_C_BillHeader_ME) and a meaningful description. Click Next. -
Select a transport request and click Finish.
Important:
Metadata Extensions allow you to separate UI-related annotations from your core CDS logic. This keeps your CDS entities clean and focused on data modeling.
-
Replace the generated code with the following:
@Metadata.layer: #CORE
@UI: {
  headerInfo: { typeName: 'Billing Document Header',
                typeNamePlural: 'Billing Documents',
                title: { type: #STANDARD, label: 'Travel', value: 'BillID' } }
              }
annotate entity zsac_c_bill_header with
{
  @UI.facet: [ { id:              'BillingDocHead',
                   purpose:         #STANDARD,
                   type:            #IDENTIFICATION_REFERENCE,
                   label:           'Header',
                   position:        10 } ]
  @EndUserText.label: 'Billing Document'
  @UI: {  lineItem:       [ { position: 10 } ],
          identification: [ { position: 10 } ],
          selectionField: [ { position: 10 } ] }
  BillId;
  @EndUserText.label: 'Billing Document Type'
  @UI: {  lineItem:       [ { position: 20 } ],
       identification: [ { position: 20 } ],
       selectionField: [ { position: 20 } ] }
  BillType;
  @EndUserText.label: 'Billing Date'
  @UI: {  lineItem:       [ { position: 30 } ] ,
        identification: [ { position: 30 } ]}
  BillDate;
  @EndUserText.label: 'Customer'
  @UI: {  lineItem:       [ { position: 40 } ] ,
        identification: [ { position: 40 } ]}
  CustomerId;
  @EndUserText.label: 'Net Amount'
  @UI: {  lineItem:       [ { position: 50 } ] ,
        identification: [ { position: 50 } ]}
  NetAmount;
  @EndUserText.label: 'Currency'
  @UI: {  lineItem:       [ { position: 60 } ] ,
        identification: [ { position: 60 } ]}
  Currency;
  @EndUserText.label: 'Sales Organization'
  @UI: {  lineItem:       [ { position: 70 } ] ,
        identification: [ { position: 70 } ]}
  SalesOrg;
}
Activate the Metadata Extension.
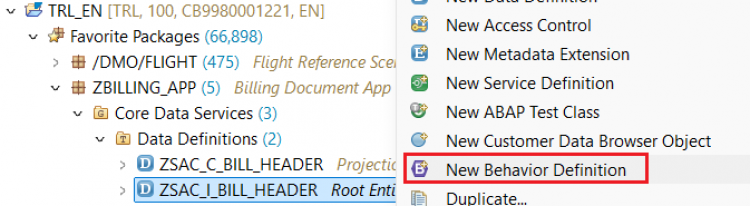
Step 6: Create a Behavior Definition and Behavior Implementation Class
A Behavior Definition specifies what operations are possible on an entity, such as Create, Read, Update, and Delete.
By default, READ/QUERY operations are enabled in a managed scenario.
-
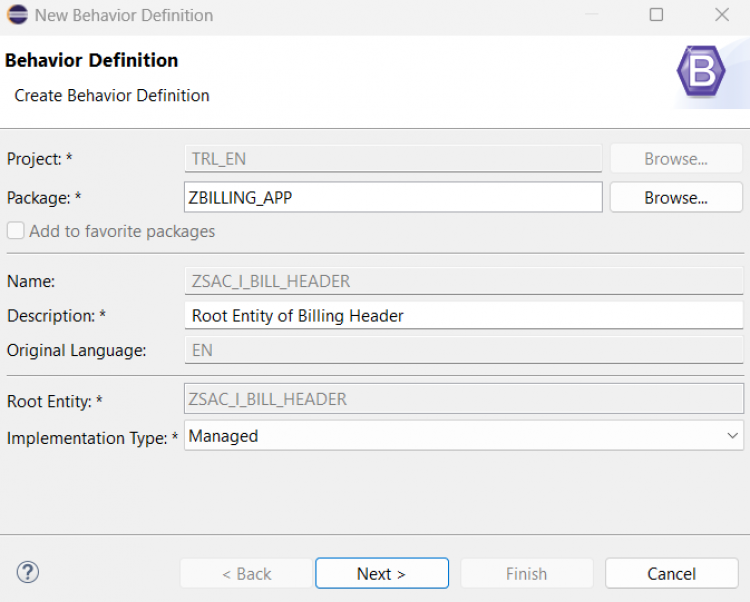
Right-click on the Root Interface View Entity and choose New Behavior Definition.
-
All details will be populated automatically. The Implementation Type is set to Managed by default. No need to change it. Click Next.
-
Select a transport request and click Finish.
-
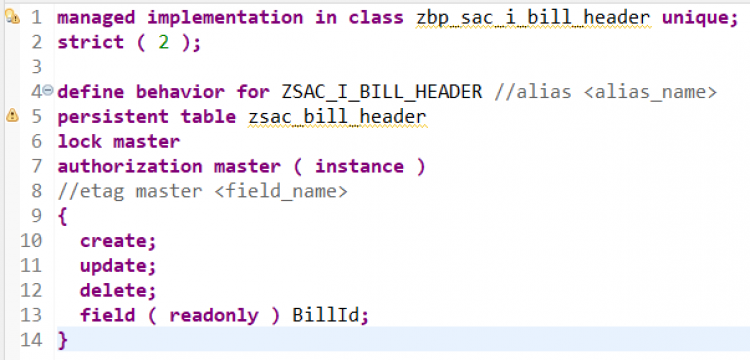
A behavior definition will be generated as shown:
-
Save and activate the behavior definition.
-
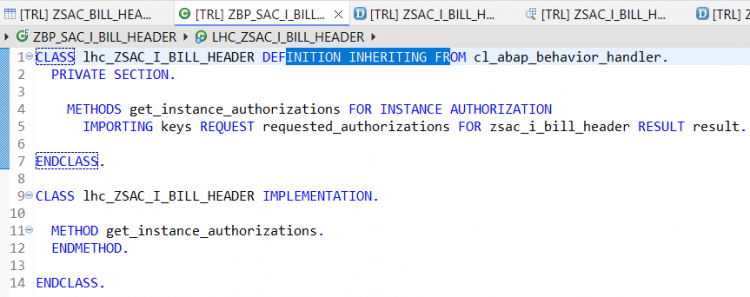
Create the Behavior Implementation Class
-
Click on the quick fix icon at line 1 to create the implementation class.
-
Choose Create Behavior Implementation Class from the options.

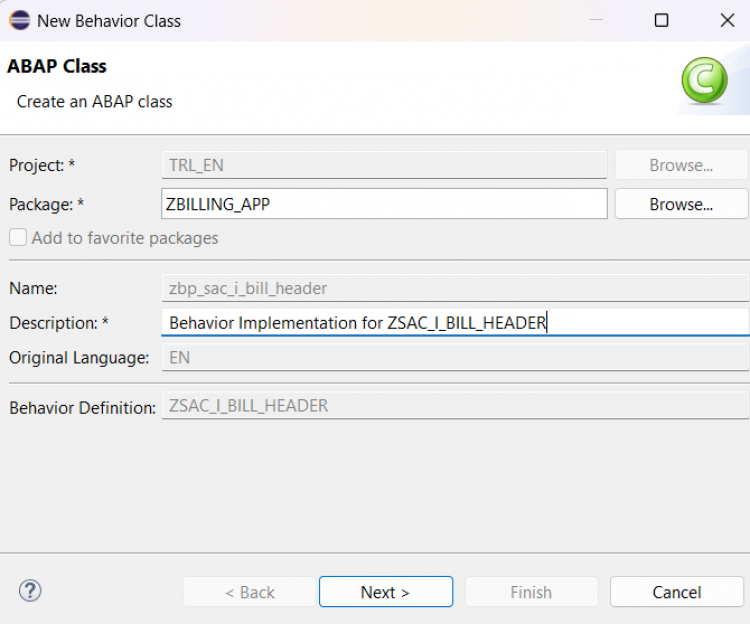
-
Select a transport request and click Finish.
-
Important:
Since we are using a Managed implementation, you don't need to manually code the standard CRUD operations. The framework handles it for you.
-
Activate the generated class without making any changes.
-
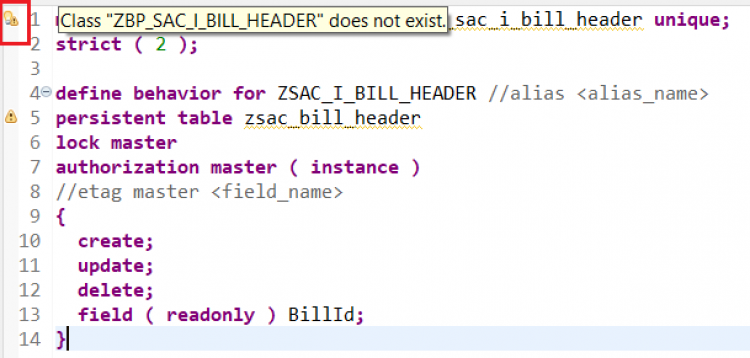
Now go back to the behavior definition and complete it with the following code:
managed implementation in class zbp_sac_i_bill_header unique;
strict ( 2 );

define behavior for ZSAC_I_BILL_HEADER
persistent table zsac_bill_header
lock master
authorization master ( instance )
{
  create;
  update;
  delete;
  field ( readonly:update, mandatory : create ) BillId;

  mapping for zsac_bill_header
    {
      BillId     = bill_id;
      BillType   = bill_type;
      BillDate   = bill_date;
      CustomerId = customer_id;
      NetAmount  = net_amount;
      Currency   = currency;
      SalesOrg   = sales_org;
      CreatedBy = createdby;
      CreateDat = createdat;
      LastChangedBy = lastchangedby;
      LastChangeDat = lastchangedat;
      LocalLastChangeDat = locallastchangedat;
    }
}
Activate the behavior definition.
Step 7: Create a Behavior Projection
A Behavior Projection is created to expose selected operations from the root behavior definition to the UI or service.
-
Create a New Behavior Projection
Right-click on the Projection View and choose New Behavior Definition.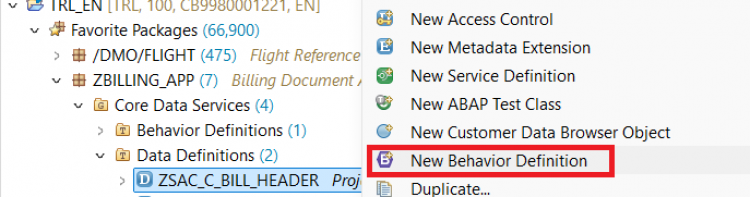
All details will be populated automatically. The Implementation Type will be set to Projection by default.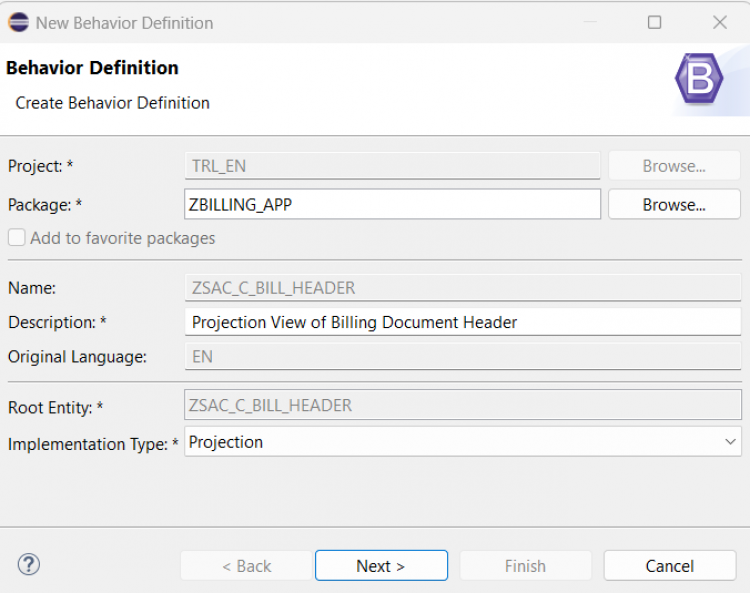
Click Next, select a transport request, and click Finish. -
Complete the Behavior Projection
Replace the generated code with the following:projection; strict ( 2 ); define behavior for zsac_c_bill_header { use create; use update; use delete; }Activate the behavior projection.
Step 8: Create a Service Definition
The Service Definition exposes your behavior and projection to external consumers, such as an OData service.
-
Right-click on the Projection View and choose New Service Definition.
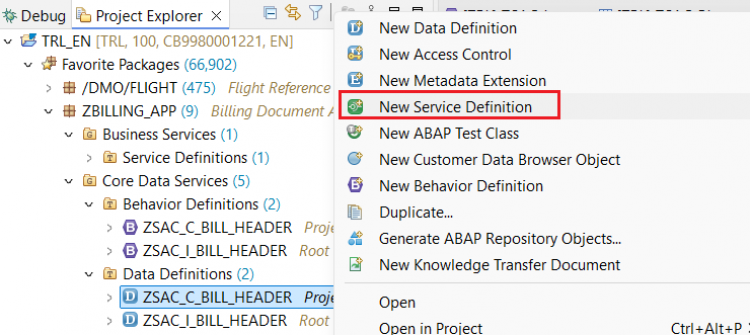
Provide a name (e.g.,ZSAC_UI_BillHeader) and description.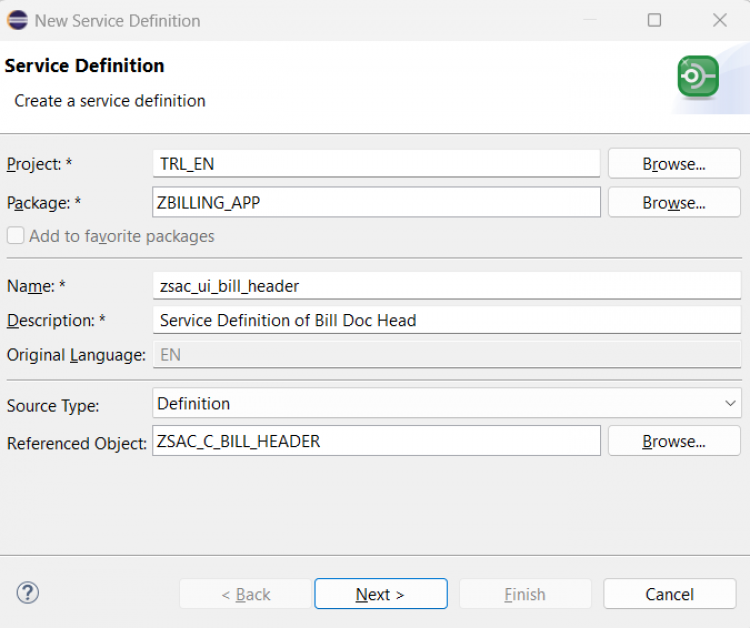
Select a transport request and click Finish. -
Complete the Service Definition
Replace the generated code with the following:@EndUserText.label: 'Service Definition of Bill Doc Head' define service Zsac_ui_bill_header { expose zsac_c_bill_header as BillingDocumentHeader; }Activate the service definition.
Step 9: Create a Service Binding
The Service Binding connects your Service Definition to an OData service, making it available for consumption via HTTP requests.
-
Right-click on the Service Definition and choose New Service Binding.
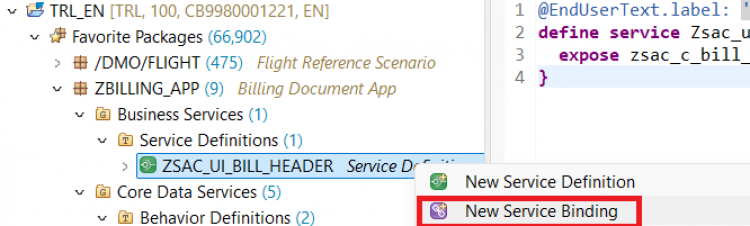
Select OData V2 - UI as the binding type. Provide a name (e.g.,ZSAC_UI_BillHeader_V2) and description.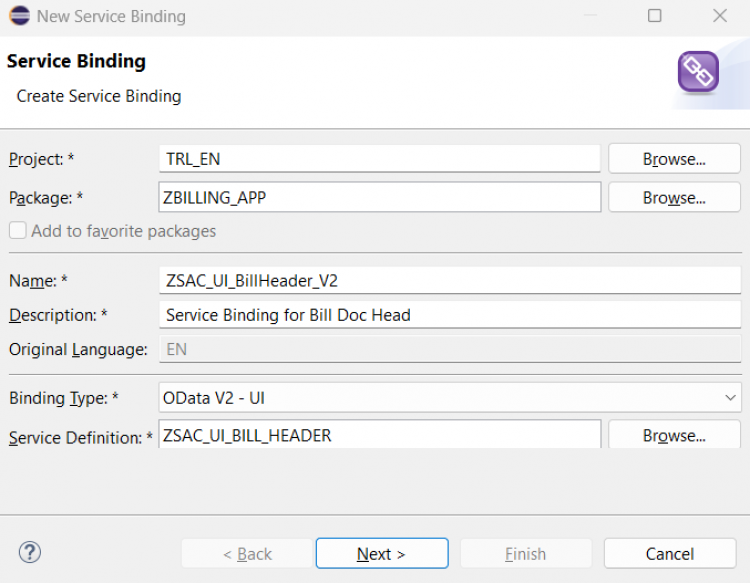
Choose a transport request and click Finish. -
Once the service binding is created, activate it. Once it's activated, publish the Service Binding.
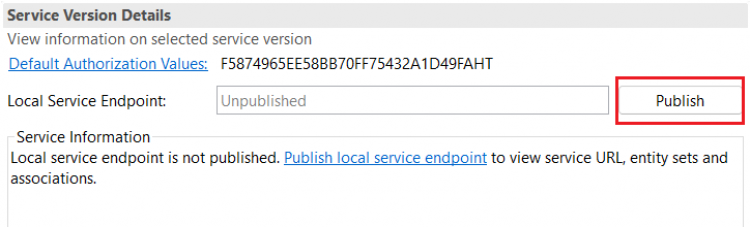
This may take few minutes. - Once the service is published, you should see the list of Entities which are exposed to test/preview. The list will contain our projection view which we exposed in the Service Definition.
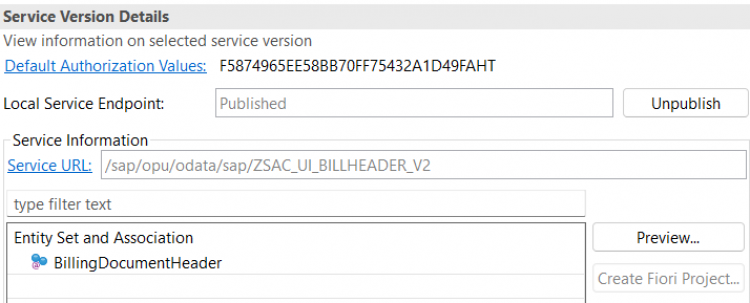
To test it, click on the Entity and click Preview button.
Preview page appears, similar to the Fiori Elements application. To check the data, click on Go button.
Click on any row of the list to navigate to the object page.
Now, you should be able to create, update, and delete records in the Billing Document Header. Try it out and see how the service responds to different CRUD operations!
Conclusion
You’ve successfully built a simple managed RAP app, from designing a custom Billing Document Header table to exposing it via an OData service and enabling basic CRUD operations. Well done!
This forms the foundation of many enterprise-grade applications. But most real-world apps involve more than just one table.
You may have lot of questions on why we did what we did, but don't worry as we will be covering all those questions in the following blogs.
👉 In the next blog, we’ll extend this app with a child entity to handle Billing Document Items using composition and UI facets.
Continue your learning, one step at a time.
If this helped you, consider sharing it with someone starting out with RAP.