
In the previous blog - Build a Simple RAP Managed App for Billing Document, we built a UI-based RAP managed app for billing document header data.
In this follow-up, we’ll extend that app by introducing a child entity: Billing Document Item. With this enhancement, the object page of the billing document header will display a table of related billing items, and allow full CRUD operations on both header and item levels.
As per the RAP model flow, for every entity we expose, we follow three steps:
-
Define the data model
-
Implement behavior
-
Expose the service
Let’s start by creating the database table for the Billing Document Item, which will be linked to the Billing Document Header as its child entity.
Step 1: Create the Database Table for Billing Item
We’ll create a transparent table that acts as a child to the billing header. Follow the steps below:
-
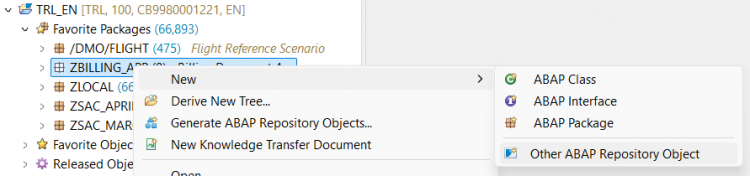
Right-click on your package → New > Other ABAP Repository Object
-
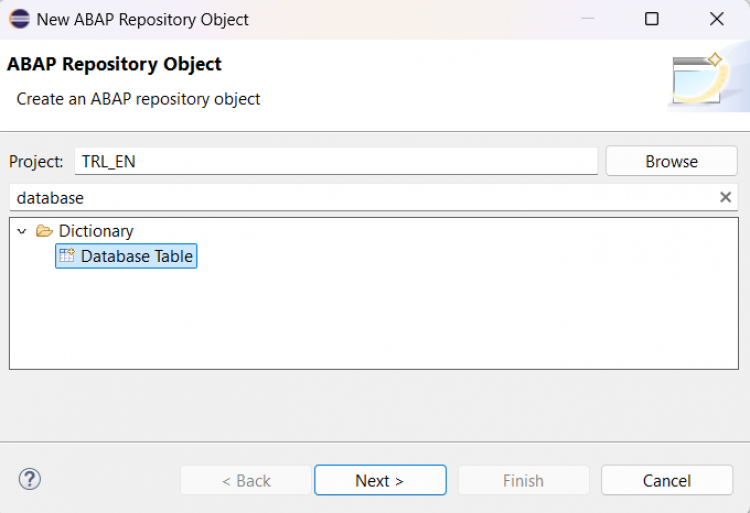
Select Database Table and click Next
-
Enter the object name (e.g.
ZSAC_BILL_ITEM) and description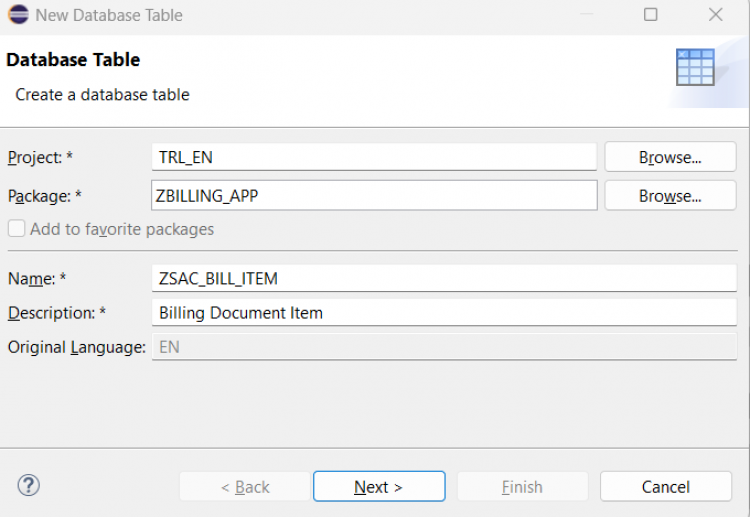
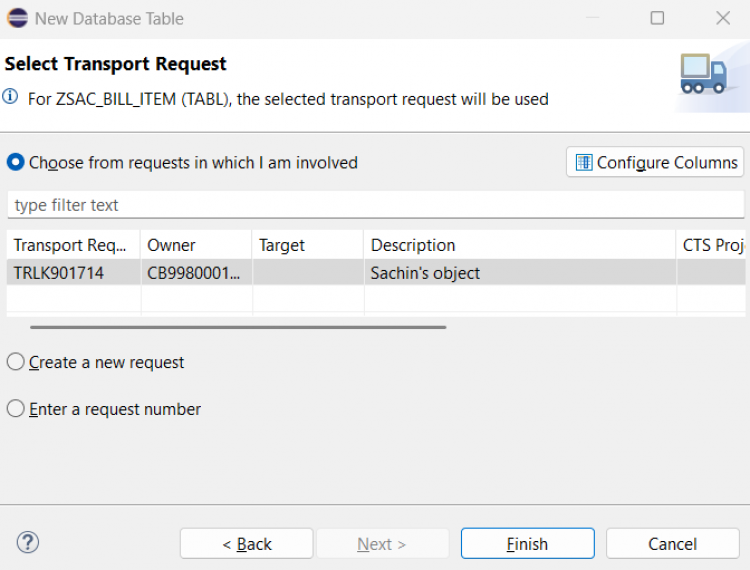
-
Choose a transport request and click Finish
-
Add fields after the
clientfield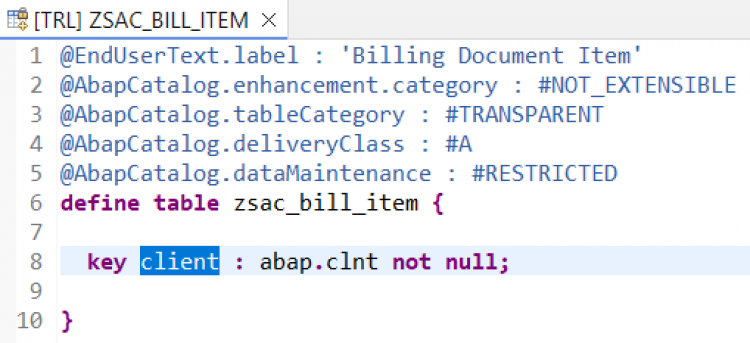
Copy the table definition below:
@EndUserText.label : 'Billing Document Item'
@AbapCatalog.enhancement.category : #NOT_EXTENSIBLE
@AbapCatalog.tableCategory : #TRANSPARENT
@AbapCatalog.deliveryClass : #A
@AbapCatalog.dataMaintenance : #RESTRICTED
define table zsac_bill_item {

  key client         : abap.clnt not null;
  key bill_id        : abap.char(10) not null;
  key item_no        : abap.numc(6) not null;
  material_id        : matnr;
  description        : abap.char(40);
  @Semantics.quantity.unitOfMeasure : 'zsac_bill_item.uom'
  quantity           : abap.quan(13,3);
  @Semantics.amount.currencyCode : 'zsac_bill_item.currency'
  item_amount        : abap.curr(15,2);
  currency           : waers;
  uom                : meins;
  createdby          : syuname;
  createdat          : timestamp;
  lastchangedby      : syuname;
  last_changed_at       : abp_lastchange_tstmpl;
  local_last_changed_at : abp_locinst_lastchange_tstmpl;

}
Step 2: Insert Sample Data into the Table
Since the item table is currently empty, let’s insert some sample data using the helper class we created earlier.
In the previous blog (Build a Simple RAP Managed App for Billing Document – Header CRUD with Custom Table), we created a helper class ZSAC_CL_BILL_DATA to populate billing header data. We will now reuse the same class to insert entries into the billing item table.
Open the class and replace the main method with the logic below:
DATA lt_bill_item TYPE STANDARD TABLE OF zsac_bill_item.

DELETE FROM zsac_bill_item.

lt_bill_item = VALUE #(
  ( client = sy-mandt bill_id = '1000000001' item_no = '000001' material_id = 'MAT001' description = 'USB Cable'      quantity = '2.000' item_amount = '500.00'  currency = 'INR' uom = 'EA' )
  ( client = sy-mandt bill_id = '1000000001' item_no = '000002' material_id = 'MAT002' description = 'Charger'        quantity = '1.000' item_amount = '1000.00' currency = 'INR' uom = 'EA' )

  ( client = sy-mandt bill_id = '1000000002' item_no = '000001' material_id = 'MAT003' description = 'Headphones'     quantity = '1.000' item_amount = '2500.00' currency = 'INR' uom = 'EA' )

  ( client = sy-mandt bill_id = '1000000003' item_no = '000001' material_id = 'MAT004' description = 'Keyboard'       quantity = '1.000' item_amount = '800.00'  currency = 'USD' uom = 'EA' )
  ( client = sy-mandt bill_id = '1000000003' item_no = '000002' material_id = 'MAT005' description = 'Mouse'          quantity = '2.000' item_amount = '1000.00' currency = 'USD' uom = 'EA' )

  ( client = sy-mandt bill_id = '1000000004' item_no = '000001' material_id = 'MAT006' description = 'Monitor'        quantity = '1.000' item_amount = '3000.00' currency = 'EUR' uom = 'EA' )

  ( client = sy-mandt bill_id = '1000000005' item_no = '000001' material_id = 'MAT007' description = 'Webcam'         quantity = '1.000' item_amount = '2200.00' currency = 'INR' uom = 'EA' )
).

INSERT zsac_bill_item FROM TABLE @lt_bill_item.
out->write( 'Billing item data is inserted' ).
Below is the complete class for reference:
CLASS zsac_cl_bill_data DEFINITION
PUBLIC
CREATE PUBLIC.
PUBLIC SECTION.
INTERFACES if_oo_adt_classrun.
ENDCLASS.
CLASS zsac_cl_bill_data IMPLEMENTATION.
METHOD if_oo_adt_classrun~main.
DATA lt_bill_item TYPE STANDARD TABLE OF zsac_bill_item.
DELETE FROM zsac_bill_item.
lt_bill_item = VALUE #(
( client = sy-mandt bill_id = '1000000001' item_no = '000001' material_id = 'MAT001' description = 'USB Cable' quantity = '2.000' item_amount = '500.00' currency = 'INR' uom = 'EA' )
( client = sy-mandt bill_id = '1000000001' item_no = '000002' material_id = 'MAT002' description = 'Charger' quantity = '1.000' item_amount = '1000.00' currency = 'INR' uom = 'EA' )
( client = sy-mandt bill_id = '1000000002' item_no = '000001' material_id = 'MAT003' description = 'Headphones' quantity = '1.000' item_amount = '2500.00' currency = 'INR' uom = 'EA' )
( client = sy-mandt bill_id = '1000000003' item_no = '000001' material_id = 'MAT004' description = 'Keyboard' quantity = '1.000' item_amount = '800.00' currency = 'USD' uom = 'EA' )
( client = sy-mandt bill_id = '1000000003' item_no = '000002' material_id = 'MAT005' description = 'Mouse' quantity = '2.000' item_amount = '1000.00' currency = 'USD' uom = 'EA' )
( client = sy-mandt bill_id = '1000000004' item_no = '000001' material_id = 'MAT006' description = 'Monitor' quantity = '1.000' item_amount = '3000.00' currency = 'EUR' uom = 'EA' )
( client = sy-mandt bill_id = '1000000005' item_no = '000001' material_id = 'MAT007' description = 'Webcam' quantity = '1.000' item_amount = '2200.00' currency = 'INR' uom = 'EA' )
).
INSERT zsac_bill_item FROM TABLE @lt_bill_item.
out->write( 'Billing item data is inserted' ).
ENDMETHOD.
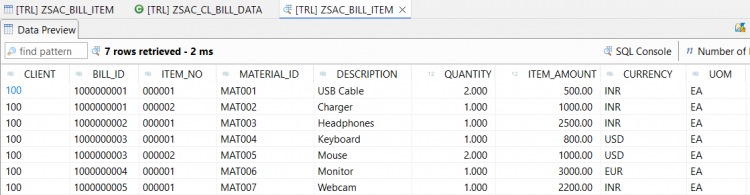
ENDCLASS.After activating the class, execute it and use Data Preview on ZSAC_BILL_ITEM table to verify that the records are inserted successfully
Step 3: Create CDS Interface View for the Child Entity
Let’s now create the interface view for the Billing Document Item table.
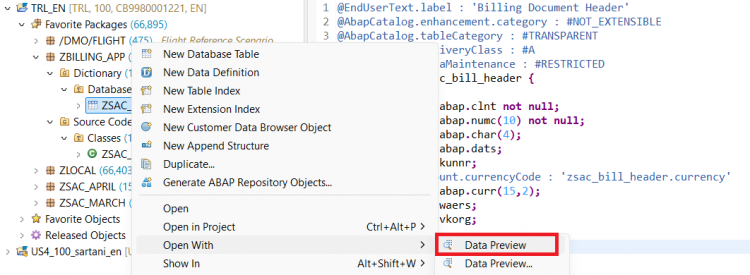
Right-click on the database table ZSAC_BILL_ITEM and select New Data Definition.
Provide a name (e.g. ZSAC_I_BILL_ITEM) and a short description for the view, then click Next.
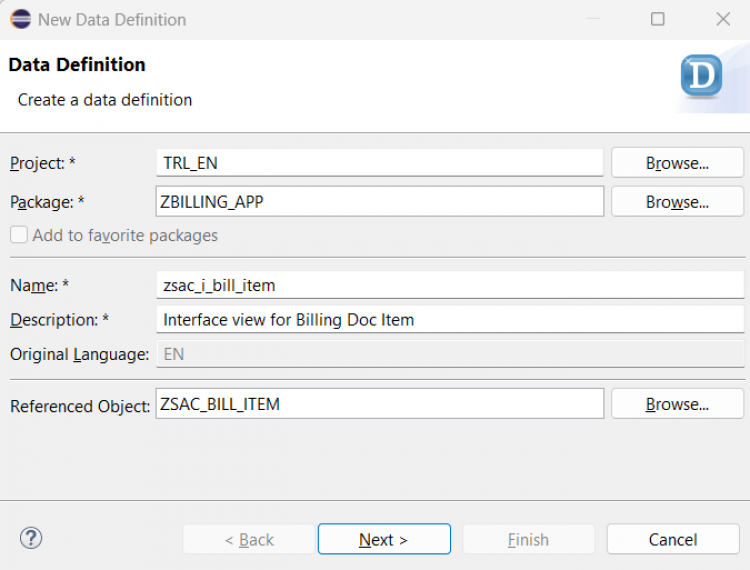
Choose your transport request and proceed.
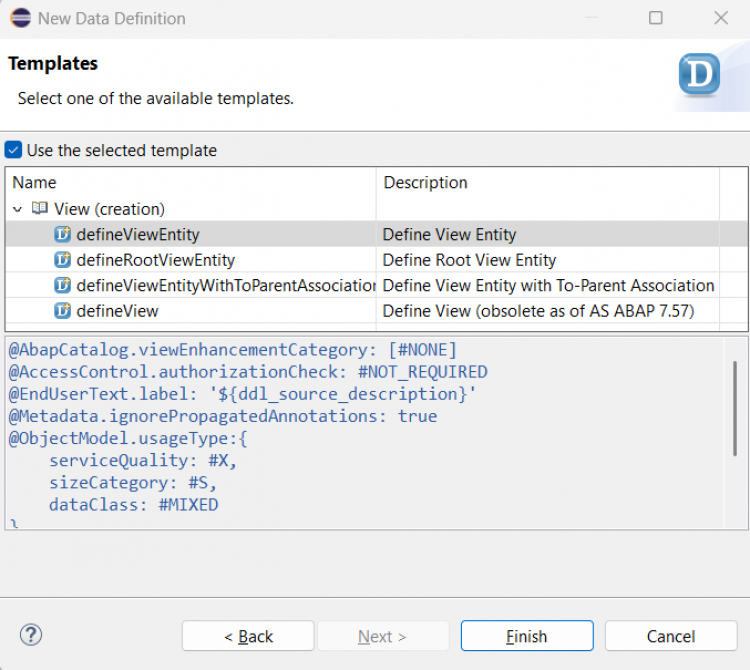
Select the template defineViewEntity and click Finish.
Replace the generated code with the below CDS logic:
@AbapCatalog.viewEnhancementCategory: [#NONE]
@AccessControl.authorizationCheck: #NOT_REQUIRED
@EndUserText.label: 'Interface view for Billing Doc Item'
@ObjectModel.usageType:{
    serviceQuality: #X,
    sizeCategory: #S,
    dataClass: #MIXED
}
define view entity zsac_i_bill_item
  as select from zsac_bill_item
  association to parent ZSAC_I_BILL_HEADER as _header on $projection.BillId = _header.BillId
{
  key BillId,
  key ItemNo,
      MaterialId,
      Description,
      Quantity,
      ItemAmount,
      Currency,
      Uom,
      @Semantics.user.createdBy: true
      CreatedBy          as CreatedBy,
      @Semantics.systemDateTime.createdAt: true
      CreateDat          as CreateDat,
      @Semantics.user.lastChangedBy: true
      LastChangedBy      as LastChangedBy,
      @Semantics.systemDateTime.lastChangedAt: true
      LastChangeDat      as LastChangeDat,
      @Semantics.systemDateTime.localInstanceLastChangedAt: true
      LocalLastChangeDat as LocalLastChangeDat,

      _header
}
In the above CDS, we’ve introduced an association to the header view (ZSAC_I_BILL_HEADER). This relationship sets up the parent-child structure between header and item entities.
Once you activate the view, you’ll notice a warning:
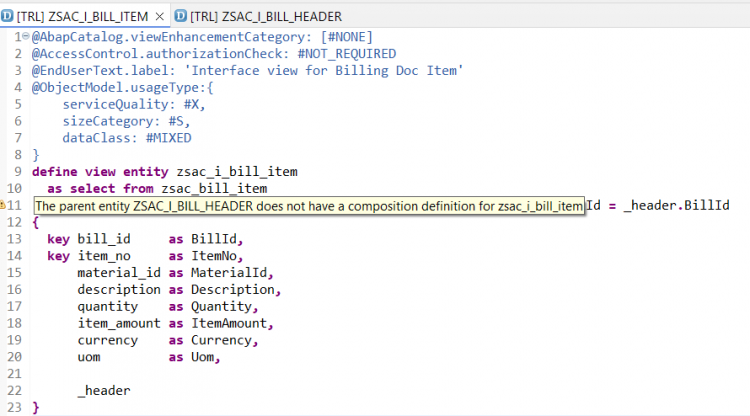
The warning indicates that the parent view (ZSAC_I_BILL_HEADER) doesn’t yet define a composition to this item view, we’ll take care of that in the next step.
Step 4: Establish Relationship of Billing Document Header View with Item View
Open the interface view ZSAC_I_BILL_HEADER and update it to define a composition to the item view, as shown below:
@AccessControl.authorizationCheck: #NOT_REQUIRED
@EndUserText.label: 'Root Entity of Billing Header'
define root view entity ZSAC_I_BILL_HEADER
  as select from zsac_bill_header
  composition [0..*] of zsac_i_bill_item as _item
{
  key bill_id            as BillId,
      bill_type          as BillType,
      bill_date          as BillDate,
      customer_id        as CustomerId,
      @Semantics.amount.currencyCode : 'Currency'
      net_amount         as NetAmount,
      currency           as Currency,
      sales_org          as SalesOrg,
      @Semantics.user.createdBy: true
      CreatedBy          as CreatedBy,
      @Semantics.systemDateTime.createdAt: true
      CreateDat          as CreateDat,
      @Semantics.user.lastChangedBy: true
      LastChangedBy      as LastChangedBy,
      @Semantics.systemDateTime.lastChangedAt: true
      LastChangeDat      as LastChangeDat,
      @Semantics.systemDateTime.localInstanceLastChangedAt: true
      LocalLastChangeDat as LocalLastChangeDat,

      _item
}
This composition defines the one-to-many relationship between the header and item entities.
Once this is added, the warning in the item view will disappear, indicating that the relationship is now fully recognized at the interface level.
Next, let’s replicate this relationship in the projection layer.
Step 5: Create CDS Projection View for the Child Entity
Right-click on the interface view ZSAC_I_BILL_ITEM and select New Data Definition.
Enter the name and description for the projection view and proceed with the wizard.

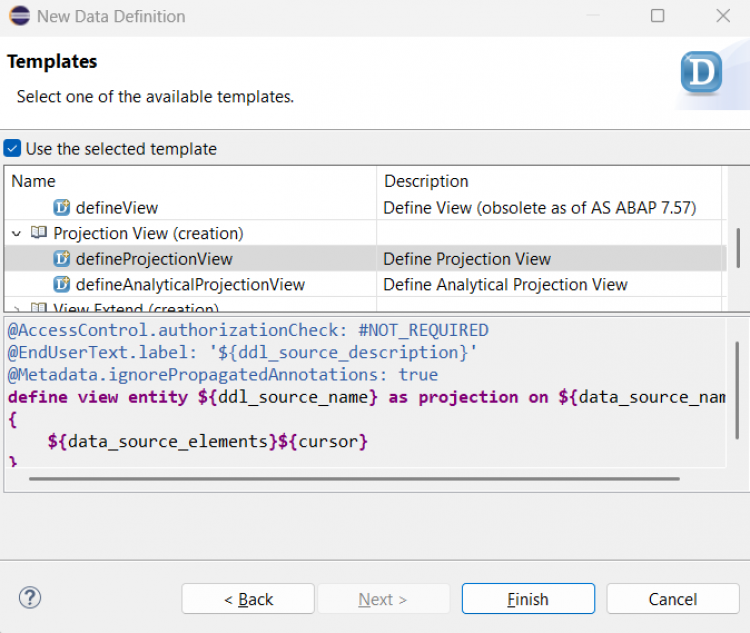
After selecting the defineProjectionView template, replace the generated code with the following:
@AccessControl.authorizationCheck: #NOT_REQUIRED
@EndUserText.label: 'Projection View of Billing Doc Item'
@Metadata.allowExtensions: true
define view entity ZSAC_C_Bill_Item
  as projection on ZSAC_I_Bill_Item
{
  key BillId,
  key ItemNo,
      MaterialId,
      Description,
      Quantity,
      ItemAmount,
      Currency,
      Uom,
      @Semantics.user.createdBy: true
      CreatedBy          as CreatedBy,
      @Semantics.systemDateTime.createdAt: true
      CreateDat          as CreateDat,
      @Semantics.user.lastChangedBy: true
      LastChangedBy      as LastChangedBy,
      @Semantics.systemDateTime.lastChangedAt: true
      LastChangeDat      as LastChangeDat,
      @Semantics.systemDateTime.localInstanceLastChangedAt: true
      LocalLastChangeDat as LocalLastChangeDat,

      /* Associations */
      _header : redirected to parent zsac_c_bill_header
}
Save and activate the view, despite the warning: “The parent entity zsac_c_bill_header does not have a composition definition for zsac_c_bill_item”
This warning will be resolved once we establish the composition in the header projection view in the next step.
Step 6: Establish Relationship of Billing Document Header with Item at Projection Level
Open the projection view ZSAC_C_BILL_HEADER and expose the child entity using redirected to composition child.
Update the code as shown below:
@AccessControl.authorizationCheck: #NOT_REQUIRED
@EndUserText.label: 'Projection View of Billing Doc Header'
@Metadata.allowExtensions: true
define root view entity zsac_c_bill_header
  provider contract transactional_query
  as projection on ZSAC_I_BILL_HEADER
{
  key BillId,
      BillType,
      BillDate,
      CustomerId,
      @Semantics.amount.currencyCode: 'Currency'
      NetAmount,
      Currency,
      SalesOrg,
      CreatedBy,
      CreateDat,
      LastChangedBy,
      LastChangeDat,
      LocalLastChangeDat,

      _item: redirected to composition child zsac_c_bill_item
}
Save and activate the view.
The warning in the child projection view will now disappear, confirming the composition is established correctly.
Step 7: Metadata Extension for Billing Document Item
Just like we added field positioning and labels for the billing document header, we’ll do the same for the billing document item.
Right-click on the child projection view ZSAC_C_BILL_ITEM, choose New Metadata Extension, enter the name and description, select your transport request, and finish the wizard.
Replace the generated code with the following:
@Metadata.layer: #CORE
annotate entity zsac_c_bill_item with
{
  @UI.facet: [ {
    id:       'BillingDocItem',
    purpose:  #STANDARD,
    type:     #IDENTIFICATION_REFERENCE,
    label:    'Item',
    position: 10
  }]
  @EndUserText.label: 'Billing Document'
  @UI: {
    lineItem:       [ { position: 10 } ],
    identification: [ { position: 10 } ],
    selectionField: [ { position: 10 } ]
  }
  BillId;

  @EndUserText.label: 'Item Number'
  @UI: {
    lineItem:       [ { position: 20 } ],
    identification: [ { position: 20 } ],
    selectionField: [ { position: 20 } ]
  }
  ItemNo;

  @EndUserText.label: 'Material'
  @UI: {
    lineItem:       [ { position: 30 } ],
    identification: [ { position: 30 } ]
  }
  MaterialId;

  @EndUserText.label: 'Description'
  @UI: {
    lineItem:       [ { position: 40 } ],
    identification: [ { position: 40 } ]
  }
  Description;

  @EndUserText.label: 'Quantity'
  @UI: {
    lineItem:       [ { position: 50 } ],
    identification: [ { position: 50 } ]
  }
  Quantity;

  @EndUserText.label: 'Unit of Measure'
  @UI: {
    lineItem:       [ { position: 60 } ],
    identification: [ { position: 60 } ]
  }
  Uom;

  @EndUserText.label: 'Amount'
  @UI: {
    lineItem:       [ { position: 70 } ],
    identification: [ { position: 70 } ]
  }
  ItemAmount;

  @EndUserText.label: 'Currency'
  @UI: {
    lineItem:       [ { position: 80 } ],
    identification: [ { position: 80 } ]
  }
  Currency;
}
⚠️ This metadata extension only affects the item service when accessed independently.
To display item data inside the object page of the header, we need to adjust the metadata extension of the header view as well.
Add an additional facet of type #LINEITEM_REFERENCE in the Metadata Extension of Header (ZSAC_C_BILL_HEADER_ME) to include the item table in the header's object page.
Update your header metadata extension as follows:
@Metadata.layer: #CORE
@UI: {
  headerInfo: {
    typeName:        'Billing Document Header',
    typeNamePlural:  'Billing Documents',
    title: {
      type:  #STANDARD,
      label: 'Billing Document',
      value: 'BillId'
    }
  }
}
annotate entity zsac_c_bill_header with
{
  @UI.facet: [
    {
      id:       'BillingDocHead',
      purpose:  #STANDARD,
      type:     #IDENTIFICATION_REFERENCE,
      label:    'Header',
      position: 10
    },
    {
      id:            'BillingDocItem',
      purpose:       #STANDARD,
      type:          #LINEITEM_REFERENCE,
      label:         'Items',
      position:      20,
      targetElement: '_item'
    }
  ]

  @EndUserText.label: 'Billing Document'
  @UI: {
    lineItem:       [ { position: 10 } ],
    identification: [ { position: 10 } ],
    selectionField: [ { position: 10 } ]
  }
  BillId;

  @EndUserText.label: 'Billing Document Type'
  @UI: {
    lineItem:       [ { position: 20 } ],
    identification: [ { position: 20 } ],
    selectionField: [ { position: 20 } ]
  }
  BillType;

  @EndUserText.label: 'Billing Date'
  @UI: {
    lineItem:       [ { position: 30 } ],
    identification: [ { position: 30 } ]
  }
  BillDate;

  @EndUserText.label: 'Customer'
  @UI: {
    lineItem:       [ { position: 40 } ],
    identification: [ { position: 40 } ]
  }
  CustomerId;

  @EndUserText.label: 'Net Amount'
  @UI: {
    lineItem:       [ { position: 50 } ],
    identification: [ { position: 50 } ]
  }
  NetAmount;

  @EndUserText.label: 'Currency'
  @UI: {
    lineItem:       [ { position: 60 } ],
    identification: [ { position: 60 } ]
  }
  Currency;

  @EndUserText.label: 'Sales Organization'
  @UI: {
    lineItem:       [ { position: 70 } ],
    identification: [ { position: 70 } ]
  }
  SalesOrg;
}
Save and activate it.
⚠️ Important Note:
The targetElement attribute in the @UI.facet annotation is case-sensitive. If your association in the consumption view is named _item, make sure you use exactly _item in targetElement. Using _Item or any other variation will result in the facet not showing up on the UI. Always match the exact case of the association name to ensure proper rendering.
Step 8: Adjustment in the Behavior Definition
Replace the existing code in behavior definition ZSAC_I_BILL_HEADER with the following:
managed implementation in class zbp_sac_i_bill_header unique;
strict ( 2 );

define behavior for ZSAC_I_BILL_HEADER
persistent table zsac_bill_header
lock master
authorization master ( instance )
{
  create;
  update;
  delete;

  field ( readonly : update, mandatory : create ) BillId;

  association _item { create; }

  mapping for zsac_bill_header
    {
      BillId     = bill_id;
      BillType   = bill_type;
      BillDate   = bill_date;
      CustomerId = customer_id;
      NetAmount  = net_amount;
      Currency   = currency;
      SalesOrg   = sales_org;
      CreatedBy = createdby;
      CreateDat = createdat;
      LastChangedBy = lastchangedby;
      LastChangeDat = lastchangedat;
      LocalLastChangeDat = locallastchangedat;
    }
}

define behavior for ZSAC_I_BILL_ITEM
persistent table zsac_bill_item
lock dependent by _header
authorization dependent by _header
{
  update;
  delete;

  field ( readonly : update, mandatory : create ) BillId, ItemNo;

  association _header;

  mapping for zsac_bill_item
  {
    BillId      = bill_id;
    ItemNo      = item_no;
    MaterialId  = material_id;
    Description = description;
    Quantity    = quantity;
    ItemAmount  = item_amount;
    Currency    = currency;
    Uom         = uom;
    CreatedBy = createdby;
    CreateDat = createdat;
    LastChangedBy = lastchangedby;
    LastChangeDat = lastchangedat;
    LocalLastChangeDat = locallastchangedat;
  }
}
This setup defines the managed behavior for both the header and the item entities. You allow create/update/delete operations, restrict certain fields like BillId and ItemNo to read-only or mandatory as appropriate, and define the composition via association.
✅ Once saved and activated, this completes the behavioral logic for your RAP-managed Billing Document app at the CDS layer.
Step 9: Adjustment in the Behavior Projection
Replace the existing code in behavior projection ZSAC_C_BILL_HEADER with the below:
projection;
strict ( 2 );

define behavior for zsac_c_bill_header
{
  use create;
  use update;
  use delete;

  use association _item { create; }
}

define behavior for zsac_c_bill_item
{
  use update;
  use delete;

  use association _header;
}
Save and activate the behavior definition.
This completes the projection behavior setup for both header and item entities. Now the app knows which operations to expose on the UI side and how the parent-child interaction works in the projected service.
Step 10: Expose Billing Document Item Entity
Expose the projection view ZSAC_C_BILL_ITEM in the service definition and activate it.
Use the following code:
@EndUserText.label: 'Service Definition of Bill Doc Head'
define service ZSAC_UI_BILL_HEADER {
  expose zsac_c_bill_header as BillingDocumentHeader;
  expose zsac_c_bill_item   as BillingDocumentItem;
}
Once activated, open the service binding. You’ll now see both the BillingDocumentHeader and BillingDocumentItem entities exposed and available for consumption.
🎉 Your RAP app now fully supports a parent-child structure with proper UI and behavior exposure.
✅ Final Step: Test Your App on Fiori Preview
Select the BillingDocumentHeader entity from the service binding and click on Preview.
You’ll land on the List Report page as shown below:
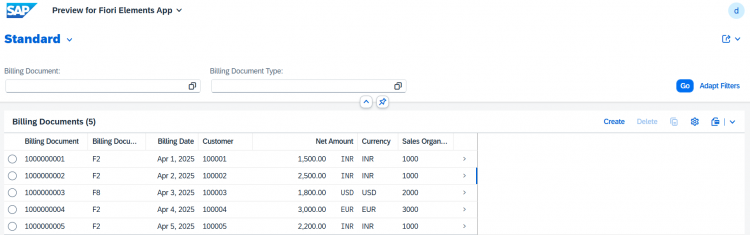
Click on any row, it navigates you to the Object Page of the selected Billing Document Header.
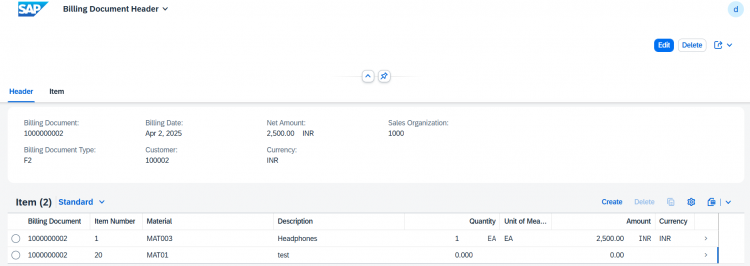
Here, you can see the list of corresponding BillingDocumentItems shown via the composition facet.
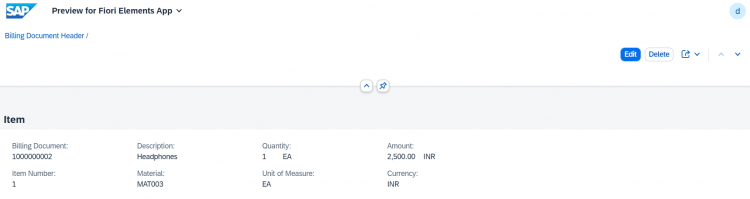
You can open the item record from the list or also directly preview the BillingDocumentItem entity to check the object page of an individual item.
Now go ahead and test the full CRUD operations -
- Create a new Billing Document with one or more items
- Edit existing entries
- Delete headers or items as needed
If all works as expected, your RAP managed app with a parent-child structure is complete.
But wait, we’re not done yet.
👉 In the next blog, we’ll enable draft capabilities in this app, so users can create and edit data in a safer, more user-friendly way, with autosave, change tracking, and no risk of accidental updates.
Thanks for reading, keep building!