
You may have heard a lot of people saying that they want to learn to create a REST API Node JS. And those who learn it says that it's not that easy to create a REST API with Node JS. You need to learn new technologies such as Node JS or Python as these two are on fire these days. But believe me, it's very easy to make one.
Let me take through a small tutorial where we will build a REST API using Node JS and Express JS in Google Cloud. This way you will learn three new technologies in 30 minutes -
- Node JS
- Express JS
- Google Cloud
Alright, let us not waste any time and start. In this tutorial, we are going to use NPM library randomcolor to create a REST API Node JS to return random color hex.
Get Started With Google Cloud For REST API Node JS
Working with Google Cloud is no big deal. We are using it to avoid any disadvantage of running the Node JS App in the localhost server. In future tutorials, you will see how using Google Cloud is advantageous to us.
Step 1: We all have a Google account with us. We will use the same account and open our Google Cloud account. Click here to open it.
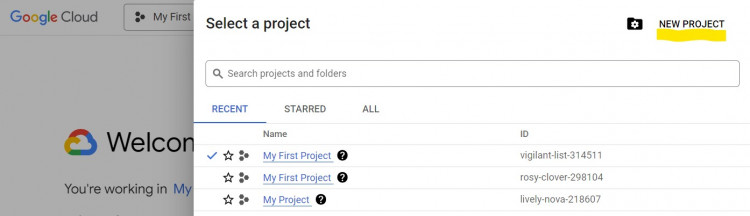
Step 2: Click on Select a project dropdown beside the logo at the top navigation menu bar and click on New Project
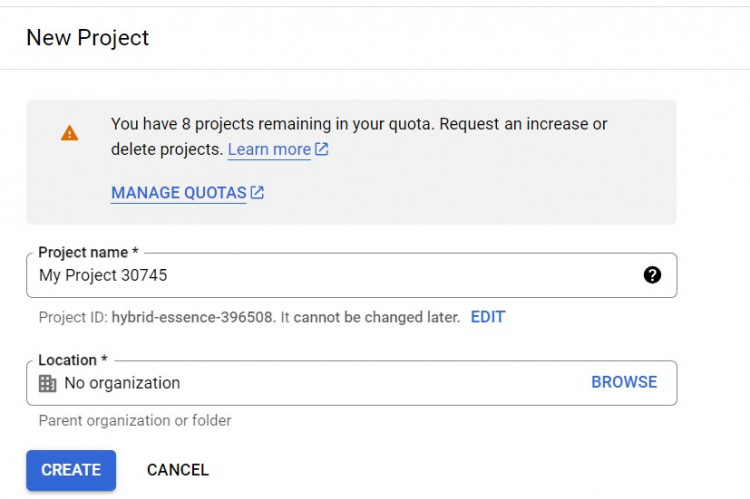
Step 3: Keeping all the default inputs as it is and click on Create
As soon as you click on the create button, a new project will be created and you will see a notification post creation. After that click on Select Project.
Step 4: We are almost set to start our Google Cloud Console. Click on Active Cloud Shell.

Now, you will find a terminal opening in the bottom of the screen. Open it in a new window, so that both the file editor as well as the terminal can be in the same screen. This way we can easily manage the files and execute the commands. Click on the icon next to close on top right side of the Shell to open it in new window.
If the editor is hidden, you can enable it by clicking on the Open Editor icon beside the terminal icon.
We are all set to install the Express JS app now.
Install Node JS and Express JS in Google Cloud
Step 1: First, we will make sure that we have the latest version of NPM installed on our server. To achieve this, run the below command in terminal -
npm install npm@latest -gHere, we are installing npm globally so that if we have to create multiple projects, we can use NPM without installing it again.
Step 2: Now that, NPM is installed with the latest version, we will install an NPM package by which we can create Express JS REST API. As we are going to create more REST API Node JS in the next tutorials, we will install the Express JS package globally. Run the below command in terminal -
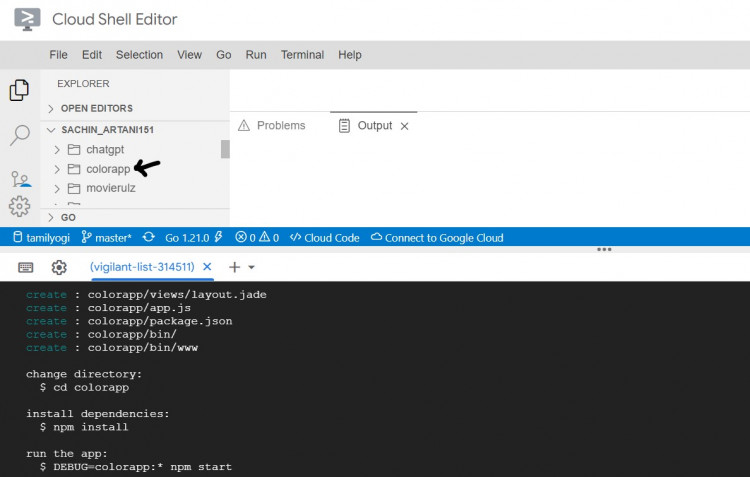
npm install express-generator -gStep 3: Creating an Express JS app is just one command away. Run the below command in the terminal.
express colorappThis way, we have created our Express JS app whose name is colorapp. The framework is ready to rock on. We just need to install all initial packages that could run the app.
Step 4: To install all required packages we will first go inside the project by running the below command.
cd colorappStep 5: The app is already created, we just need to install all the packages which could make our app running. Run the below command to achieve this.
npm installStep 6: The default port of any REST API Node JS app is 3000. So, to run this app, we should be opening it in port 3000. Just in case you make any mistake while running the app and encounter the error - "Port 3000 is already in use". In the file editor, navigate to bin folder of our app and open the file www. Below you can change your port to any custom port. But I would recommend you to use between 3000-4000.
var port = normalizePort(process.env.PORT || '3000');Step 7: Now you can just run below command to test your first REST API made in Node JS and Express JS.
npm startYou can test the REST API Node JS by clicking on Web Preview icon on the top right navbar.
Enter your port number if not already shown in the options and click on Change and Preview.
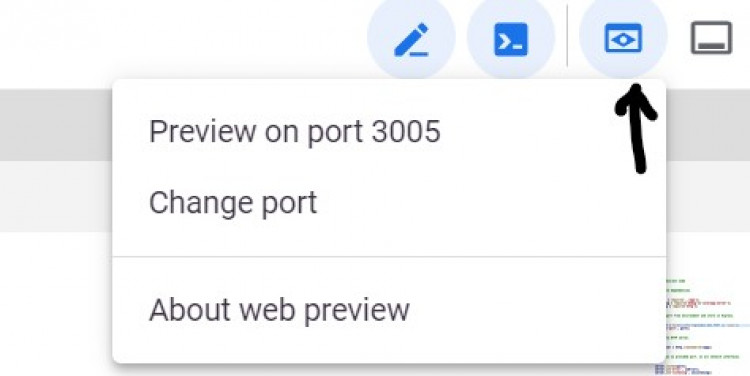
You can see the REST API Node JS running and giving output.
REST API Node JS TO Return Random Color Hex
Now that our REST API Node JS is created. We can app new packages and try to make it useful. For this, we will use a random color generator package that will return the hexadecimal format of color.
To install any new package, first, we would need to stop our running app. To do this, come back to the terminal and press CTRL + C. Doing this will stop the app running.
Step 1: Now we are good to execute new commands. Run the below command to add a new package to our REST API Node JS App.
npm i randomcolorStep 2: Navigate to the index.js file in the routes folder in the editor.
To use this package, we have to call it in our index.js file. Add below code on line 3.
var colors = require('color-name');Step 3: Now that we have called this package in our index.js file, we are good to use it. Add below code in get method.
var color = randomColor();
res.send("Random Color Hex: "+ color);
Since we are creating a REST API Node JS and not a web page, we have to return the data to the caller either in text, JSON, or XML format. At present, the app is rendering the data and giving output to the browser. Hence, we will comment render function call.
That's it. We have completed the app. You can now run the command NPM start and see a new Hex color generated every time you refresh the app.
This is the whole code inside index.js -
var express = require('express');
var router = express.Router();
var randomColor = require('randomcolor');

/* GET home page. */
router.get('/', function(req, res, next) {
    var word = randomColor();
    res.send("Random Color Hex: "+ word);
});

module.exports = router;
The app will be running temporarily and the Google cloud URL cannot be used as an endpoint to use anywhere. To make it permanently running, you need to host the app to your own server.
I hope you found this tutorial easy. Thanks for reading!